Installing Package Manager
Prerequisites
- Installed and running Sofie Core
- Initial Sofie Core Setup
- Installed and configured Demo Blueprints
- Installed, configured, and running CasparCG Server (Optional)
FFmpegandFFprobeavailable inPATH
Package Manager is used by Sofie to copy, analyze, and process media files. It is what powers Sofie's ability to copy media files to playout devices, to know when a media file is ready for playout, and to display details about media files in the rundown view such as scene changes, black frames, freeze frames, and more.
Although Package Manager can be used to copy any kind of file to/from a wide array of devices, we'll be focusing on a basic CasparCG Server Server setup for this guide.
Sofie supports only one Package Manager running for a Studio. Attaching more at a time will result in weird behaviour due to them fighting over reporting the statuses of packages. If you feel like you need multiple, then you likely want to run Package Manager in the distributed setup instead.
Installation For Development (Quick Start)
Package Manager is a suite of standalone applications, separate from Sofie Core. This guide assumes that Package Manager will be running on the same computer as CasparCG Server and Sofie Core, as that is the fastest way to set up a demo. To get all parts of Package Manager up and running quickly, execute these commands:
git clone https://github.com/Sofie-Automation/sofie-package-manager.git
cd sofie-package-manager
yarn install
yarn build
yarn start:single-app
On first startup, Package Manager will exit with the following message:
Not setup yet, exiting process!
To setup, go into Core and add this device to a Studio
This first run is necessary to get the Package Manager device registered with Sofie Core. We'll restart Package Manager later on in the Configuration instructions.
Installation In Production
Only one Package Manager can be running for a Sofie Studio. If you reached this point thinking of deploying multiple, you will want to follow the distributed setup.
Simple Setup
For setups where you only need to interact with CasparCG on one machine, we provide pre-built executables for Windows (x64) systems. These can be found on the Releases GitHub repository page for Package Manager. For a minimal installation, you'll need the package-manager-single-app.exe and worker.exe. Put them in a folder of your choice. You can also place ffmpeg.exe and ffprobe.exe alongside them, if you don't want to make them available in PATH.
package-manager-single-app.exe --coreHost=<Core Host Name> --corePort=<Core HTTP(S) port> --deviceId=<Peripheral Device Id> --deviceToken=<Peripheral Device Token/Password>
Package Manager can be launched from CasparCG Launcher alongside Caspar-CG. This will make management and log collection easier on a production Video Server.
You can see a list of available options by running package-manager-single-app.exe --help.
In some cases, you will need to run the HTTP proxy server component elsewhere so that it can be accessed from your Sofie UI machines.
For this, you can run the sofietv/package-manager-http-server docker image, which exposes its service on port 8080 and expects /data/http-server to be persistent storage.
When configuring the http proxy server in Sofie, you may need to follow extra configuration steps for this to work as expected.
Distributed Setup
For setups where you need to interact with multiple CasparCG machines, or want a more resilient/scalable setup, Package Manager can be partially deployed in Docker, with just the workers running on each CasparCG machine.
An example docker-compose of the setup is as follows:
services:
  # Fix Ownership of HTTP Server
  # Because docker volumes are owned by root by default
  # And our images follow best-practise and don't run as root
  change-vol-ownerships:
    image: node:22-alpine3.22
    user: 'root'
    volumes:
      - http-server-data:/data/http-server
    entrypoint: ['sh', '-c', 'chown -R node:node /data/http-server']

  http-server:
    image: ghcr.io/sofie-automation/sofie-package-manager-http-server:v1.52.0
    environment:
      HTTP_SERVER_BASE_PATH: '/data/http-server'
    ports:
      - '8080:8080'
    volumes:
      - http-server-data:/data/http-server
    depends_on:
      change-vol-ownerships:
        condition: service_completed_successfully

  workforce:
    image: ghcr.io/sofie-automation/sofie-package-manager-workforce:v1.52.0
    ports:
      - '8070:8070' # this needs to be exposed so that the workers can connect back to it
    # environment:
    #   - WORKFORCE_ALLOW_NO_APP_CONTAINERS=1 # Uncomment this if your workers are in docker, to disable the check for no appContainers

  # You can deploy workers in docker too, which requires some additional configuration of your containers.
  # This does not support FILESHARE accessors, they must be explicitly mounted as volumes
  # You will likely want to deploy more than 1 worker
  # worker0:
  #   image: ghcr.io/sofie-automation/sofie-package-manager-worker:v1.52.0
  #   command:
  #     - --logLevel=debug
  #     - --workforceURL=ws://workforce:8070
  #     - --costMultiplier=0.5
  #     - --resourceId=docker
  #     - --networkIds=networkDocker
  #   volumes:
  #     - ./media-source:/data/source:ro

  package-manager:
    depends_on:
      - http-server
      - workforce
    image: ghcr.io/sofie-automation/sofie-package-manager-package-manager:v1.52.0
    environment:
      CORE_HOST: '172.18.0.1' # the address for connecting back to Sofie core from this image
      CORE_PORT: '3000'
      DEVICE_ID: 'my-package-manager-id'
      DEVICE_TOKEN: 'some-secret'
      WORKFORCE_URL: 'ws://workforce:8070' # referencing the workforce component above
      PACKAGE_MANAGER_PORT: '8060'
      PACKAGE_MANAGER_URL: 'ws://insert-service-ip-here:8060' # the workers connect back to this address, so it needs to be accessible from the workers
      # CONCURRENCY: 10 # How many expectation states can be evaluated at the same time
    ports:
      - '8060:8060'

networks:
  default:
volumes:
  http-server-data:
In addition to this, you will need to run the appContainer and workers on each windows machine that package-manager needs access to:
./appContainer-node.exe
  --appContainerId=caspar01 // This is a unique id for this instance of the appContainer
  --workforceURL=ws://workforce-service-ip:8070
  --resourceId=caspar01 // This should also be set in the 'resource id' field of the `casparcgLocalFolder1` accessor. This is how Package Manager can identify which machine is which.
  --networkIds=pm-net // This is not necessary, but can be useful for more complex setups
You can get the windows executables from Releases GitHub repository page for Package Manager. You'll need the appContainer-node.exe and worker.exe. Put them in a folder of your choice. You can also place ffmpeg.exe and ffprobe.exe alongside them, if you don't want to make them available in PATH.
Note that each appContainer needs to use a different resourceId and will need its own package containers set to use the same resourceIds if they need to access the local disk. This is how package-manager knows which workers have access to which machines.w
Configuration
- Open the Sofie Core Settings page (http://localhost:3000/settings?admin=1), click on your Studio, and then Peripheral Devices.
- Click the plus button (
+) in the Parent Devices section and configure the created device to be for your Package Manager. - On the sidebar under the current Studio, select to the Package Manager section.
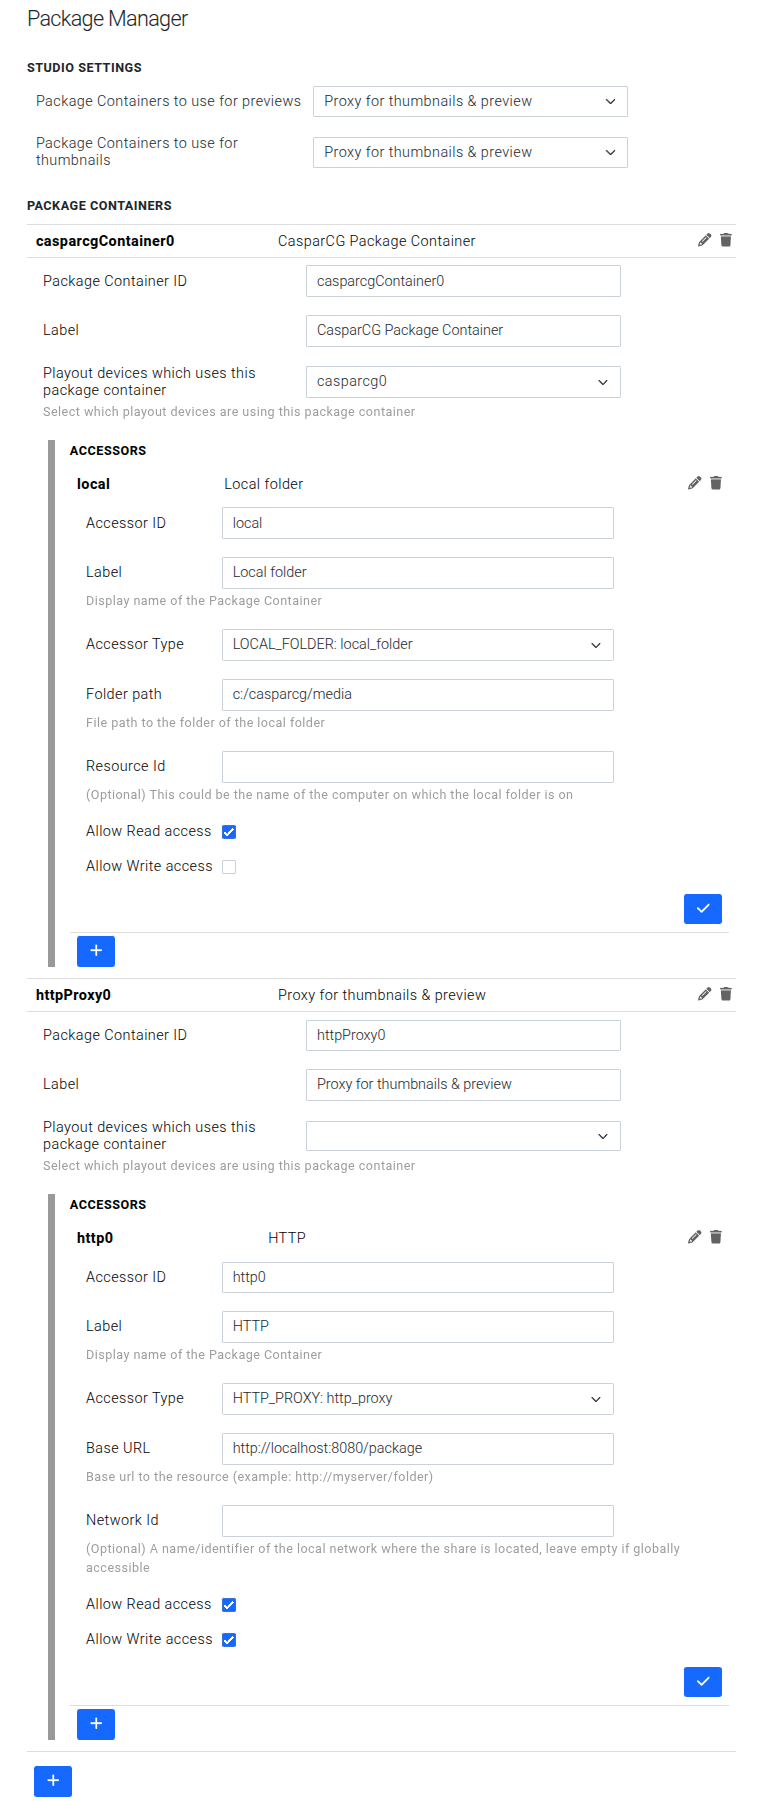
- Click the plus button under the Package Containers heading, then click the edit icon (pencil) to the right of the newly-created package container.
- Give this package container an ID of
casparcgContainer0and a label ofCasparCG Package Container. - Click on the dropdown under "Playout devices which use this package container" and select
casparcg0.- If you don't have a
casparcg0device, add it to the Playout Gateway under the Devices heading, then restart the Playout Gateway. - If you are using the distributed setup, you will likely want to repeat this step for each CasparCG machine. You will also want to set
Resource Idto match theresourceIdvalue provided in the appContainer command line.
- If you don't have a
- Click the plus button under "Accessors", then click the edit icon to the right of the newly-created accessor.
- Give this accessor an ID of
local, a Label ofLocal, an Accessor Type ofLOCAL, and a Folder path matching your CasparCGmediafolder. Then, ensure that only the "Allow Read access" boxes are checked. Finally, click the done button (checkmark icon) in the bottom right. - Click the plus button under the Package Containers heading, then click the edit icon (pencil) to the right of the newly-created package container.
- Give this package container an ID of
httpProxy0and a label ofProxy for thumbnails & preview. - Click the plus button under "Accessors", then click the edit icon to the right of the newly-created accessor.
- Give this accessor an ID of
http0, a Label ofHTTP, an Accessor Type ofHTTP_PROXY, and a Base URL ofhttp://localhost:8080/package. Then, ensure that both the "Allow Read access" and "Allow Write access" boxes are checked. Finally, click the done button (checkmark icon) in the bottom right. - Scroll back to the top of the page and select
Proxy for thumbnails & previewfor both "Package Containers to use for previews" and "Package Containers to use for thumbnails". - Your settings should look like this once all the above steps have been completed:
- If Package Manager
start:single-appis running, restart it. If not, start it (see the above Installation instructions for the relevant command line).
Separate HTTP proxy server
In some setups, the URL of the HTTP proxy server is different when accessing the Sofie UI and Package Manager. You can use the 'Network ID' concept in Package Manager to provide guidance on which to use when.
By adding --networkIds=pm-net (a semi colon separated list) when launching the exes on the CasparCG machine, the application will know to prefer certain accessors with matching values.
Then in the Sofie UI:
- Return to the Package Manager settings under the studio
- Expand the
httpProxy0container. - Edit the
http0accessor to have aBase URLthat is accessible from the casparcg machines. - Set the
Network IDtopm-net(matching what was passed in the command line) - Click the plus button under "Accessors", then click the edit icon to the right of the newly-created accessor.
- Give this accessor an ID of
publicHttp0, a Label ofPublic HTTP Proxy Accessor, an Accessor Type ofHTTP_PROXY, and a Base URL that is accessible to your Sofie client network. Then, ensure that only the "Allow read access" box is checked. Finally, click the done button (checkmark icon) in the bottom right.
Usage
In this basic configuration, Package Manager won't be copying any packages into your CasparCG Server media folder. Instead, it will simply check that the files in the rundown are present in your CasparCG Server media folder, and you'll have to manually place those files in the correct directory. However, thumbnail and preview generation will still function, as will status reporting.
If you're using the demo rundown provided by the Rundown Editor, you should already see work statuses on the Package Status page (Status > Packages).
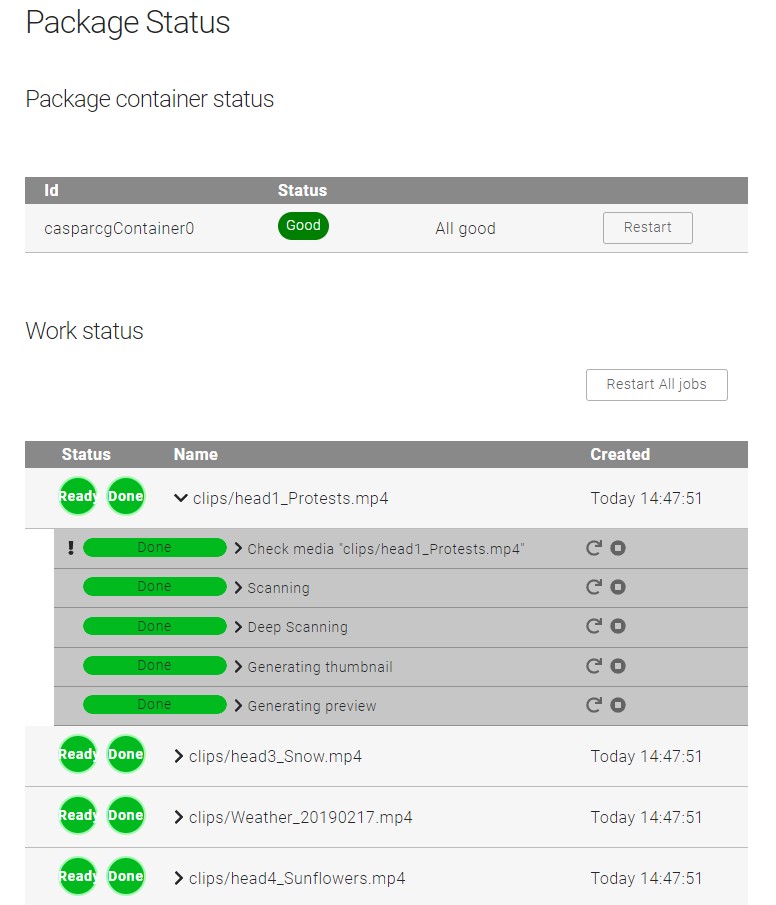
If all is good, head to the Rundowns page and open the demo rundown.
Further Reading
- Package Manager on GitHub.